IdControl Docs
πŸ“šComplete Guide

IdControl Registration Guide

Master the app in minutes with our step-by-step training guide. Follow along with visual examples and detailed instructions.

12
Steps
5-10
Minutes
100%
Success Rate

PDF: print dialog opens β€” choose "Save as PDF". HTML: save a file, open in a browser, then print to PDF.

πŸŽ₯
Start here

App Guide Video

A quick walkthrough of the full registration flow β€” watch once and you’re ready to go

Phone (left): App guide β€” login, photo, documents, QR code. Laptop (right): Dashboard walkthrough. Pick the one that matches how you’ll use the app.

App guide (phone)
Dashboard demo (laptop)
β›Ά Fullscreen for best viewπŸ”Š Turn on sound for narration⏸ Pause anytime to follow along
πŸš€

Quick Start Checklist

Get started in minutes

πŸ“±

What You'll Need

  • Your smartphone or tablet
  • Internet connection (Wi-Fi or mobile data)
  • Camera access
  • Your Emirates ID or Passport
  • Your login credentials
⏱️

Time Required

5-10minutes

Complete the entire registration process

🎯

Quick Flow

  1. Login β†’ Enter credentials
  2. Allow Camera Permission β†’ Tap "While using the app"
  3. Select Space β†’ Choose location
  4. Start Registration β†’ Tap button
  5. Take Photo β†’ Step 1
  6. Upload Documents β†’ Step 2
  7. Review & Submit β†’ Step 3
πŸš€
01

Splash Screen

App starts here - Initial loading screen

⏱️ 5 seconds
Splash Screen - App starts here - Initial loading screen
πŸ”Click to enlarge

πŸ“ Step-by-Step Instructions

οΏ½
πŸ“± The app begins with a splash screen showing the app logo
⏱
⏱️ This screen appears briefly while the app loads and initializes
➑
➑️ Automatically navigates to Login screen after loading
οΏ½
πŸ’‘ No action required - just wait for the app to load
πŸ“·
02

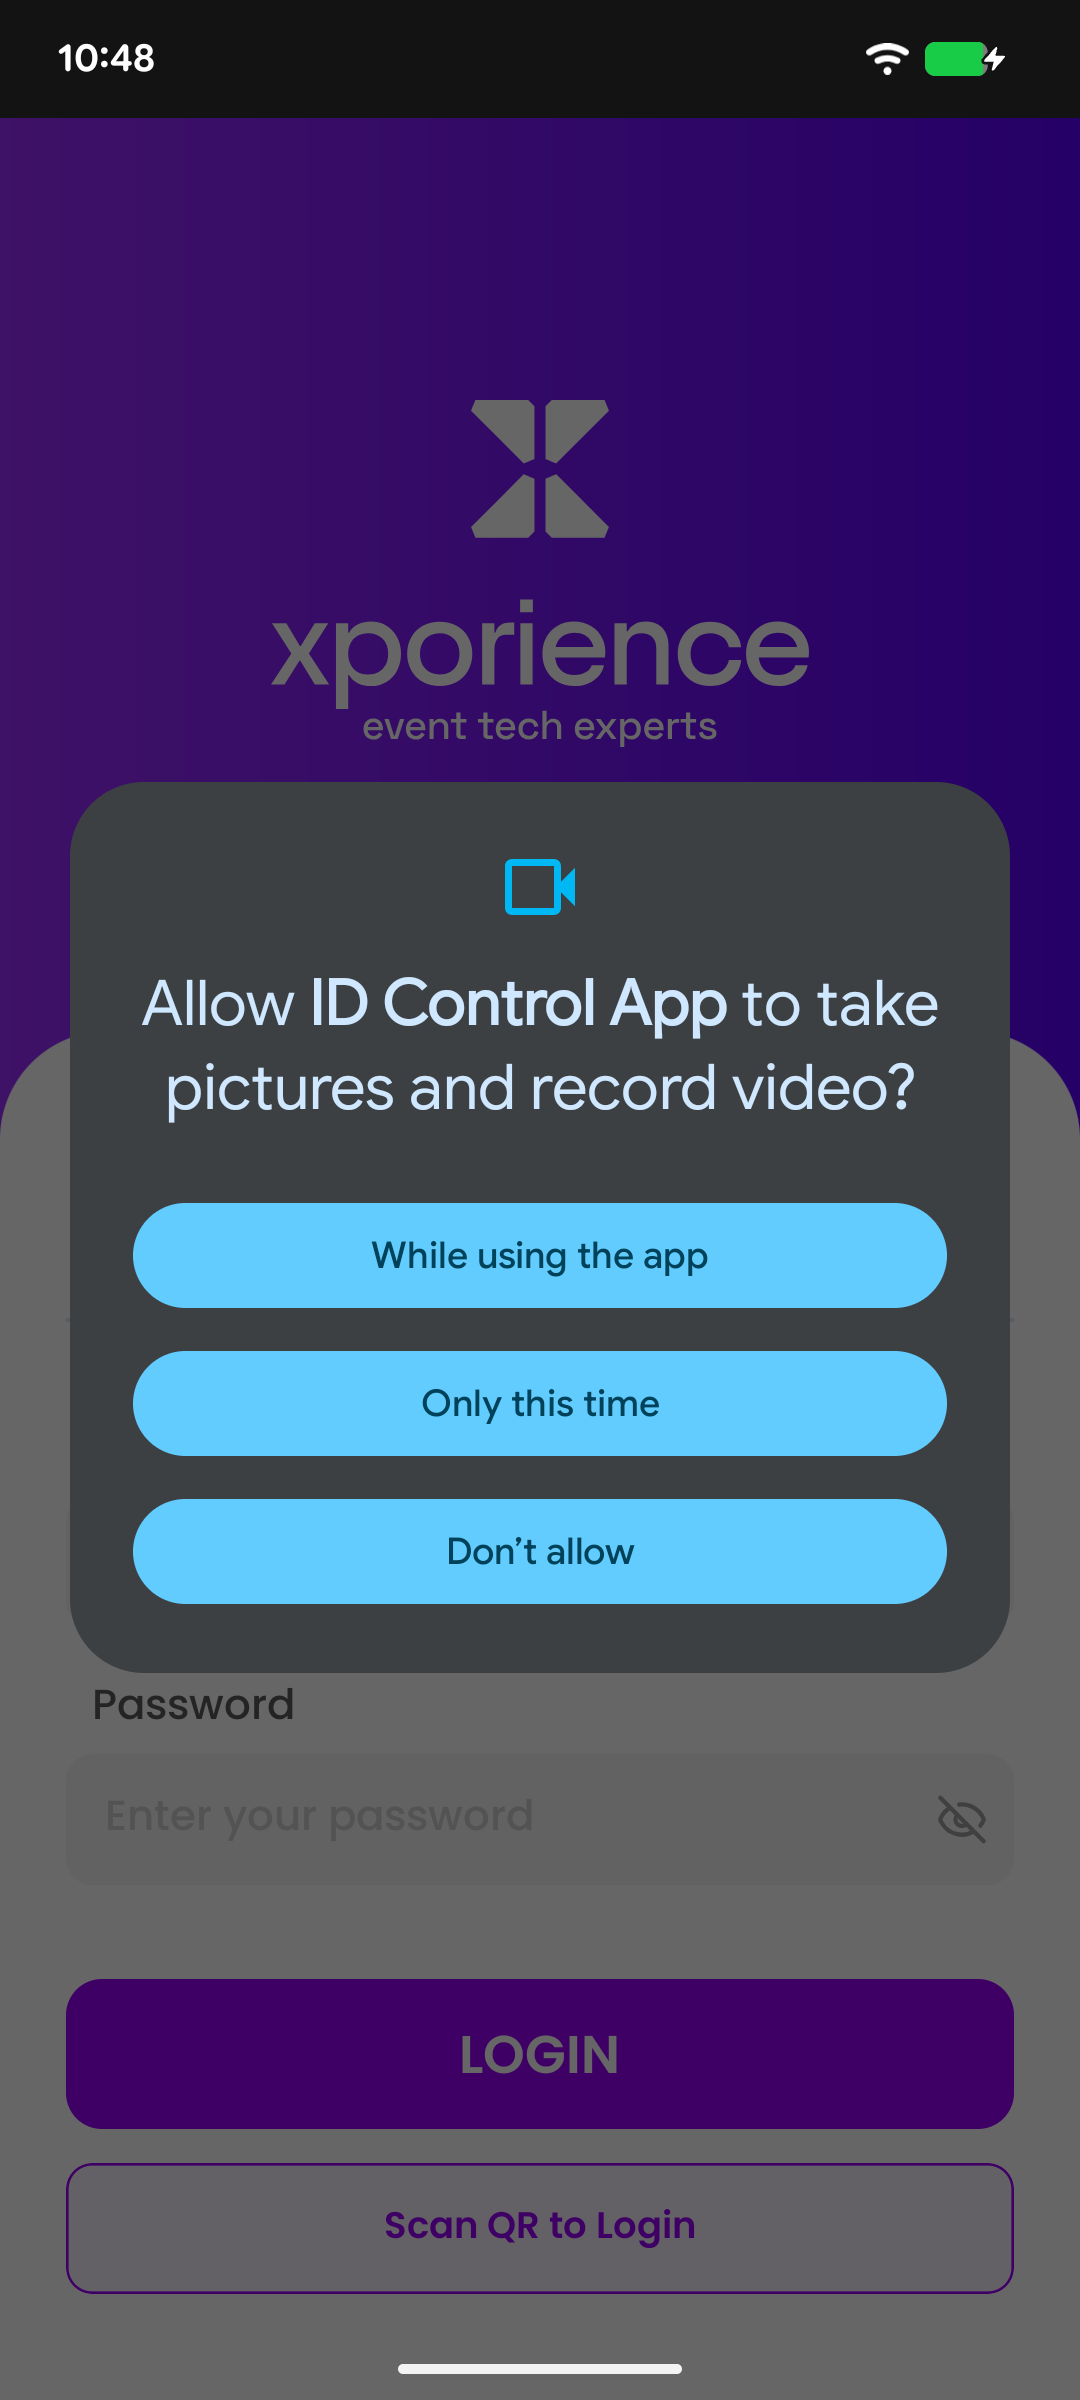
Camera Permission Prompt

Allow camera access after splash to continue using scanner and capture features

⏱️ 5-10 seconds
Camera Permission Prompt - Allow camera access after splash to continue using scanner and capture features
πŸ”Click to enlarge

πŸ“ Step-by-Step Instructions

1
After the splash screen, the app may show camera permission popup
2
Tap "While using the app" to allow camera access
3
This permission is required for QR scanning and photo/document capture
4
If you tap "Don't allow", registration steps using camera will not work
οΏ½
πŸ’‘ You can change permission later from phone Settings > Apps > ID Control App > Permissions
⚠️Important

Camera permission is mandatory for registration flow features such as photo capture and document scanning.

πŸ”
03

Login Screen

Enter your credentials to access the app

⏱️ 30 seconds
Login Screen - Enter your credentials to access the app
πŸ”Click to enlarge

πŸ“ Step-by-Step Instructions

1
Enter your Username in the username field
2
Enter your Password in the password field
3
Tap the eye icon to show/hide your password if needed
4
Tap the "LOGIN" button to proceed
βœ…
βœ… After successful login, you'll see the Space Selection bottom sheet
⚠
⚠️ Make sure you have an active internet connection
🏒
04

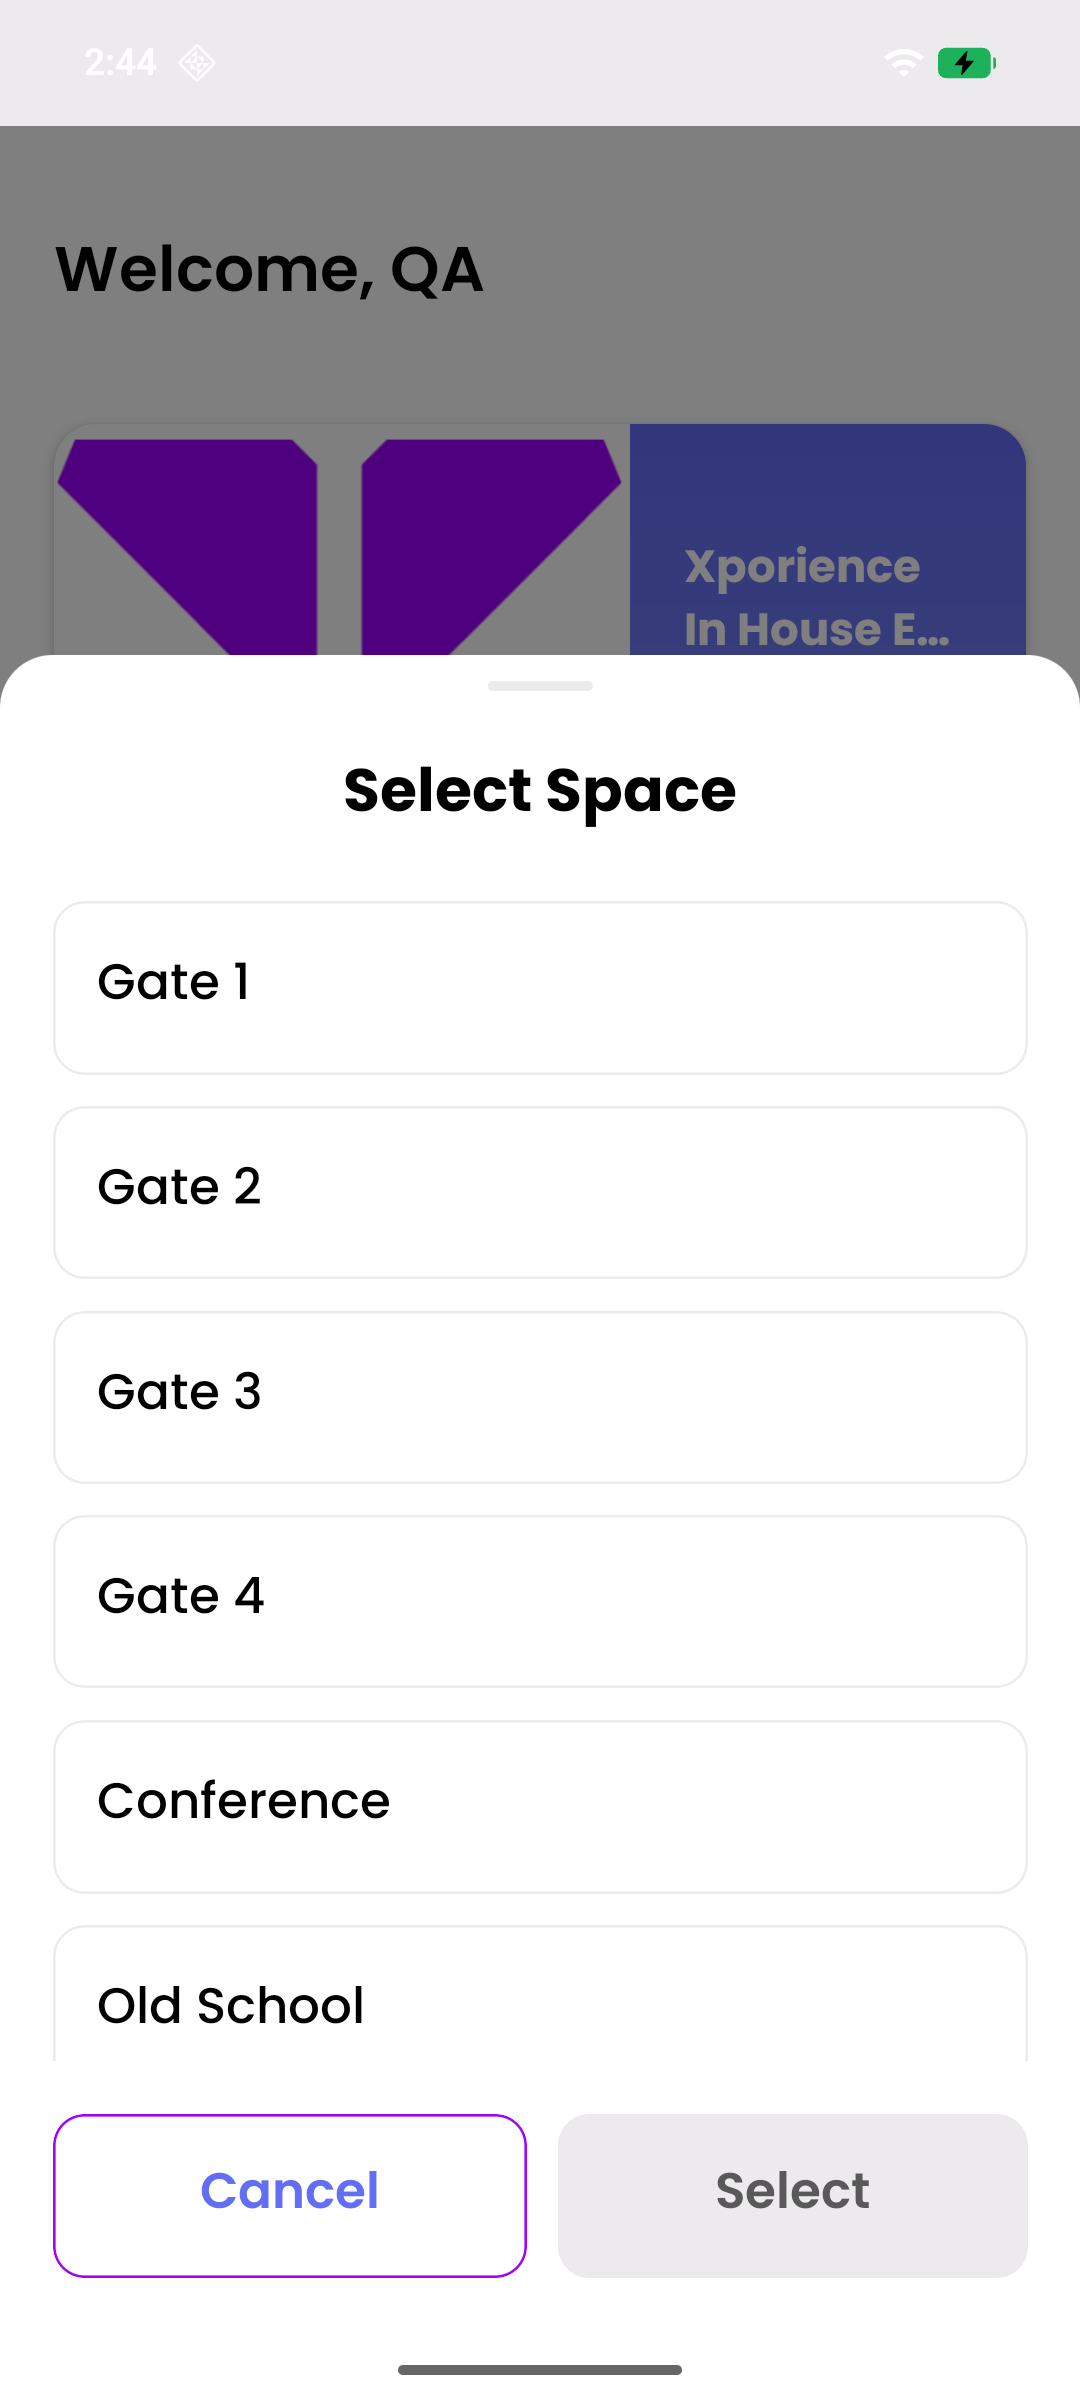
Space Selection

Select your event space from the list

⏱️ 30 seconds
Space Selection - Select your event space from the list
πŸ”Click to enlarge

πŸ“ Step-by-Step Instructions

1
A bottom sheet will appear automatically after login
2
Browse through available spaces (Gate 1, Gate 2, Conference, etc.)
3
Tap on your desired space to select it
4
Tap "Select" button to confirm your choice
5
You can change space anytime from the Home screen
⚠
⚠️ Space selection is required before starting registration
οΏ½
πŸ’‘ The selected space will be displayed on the Home screen
🏠
05

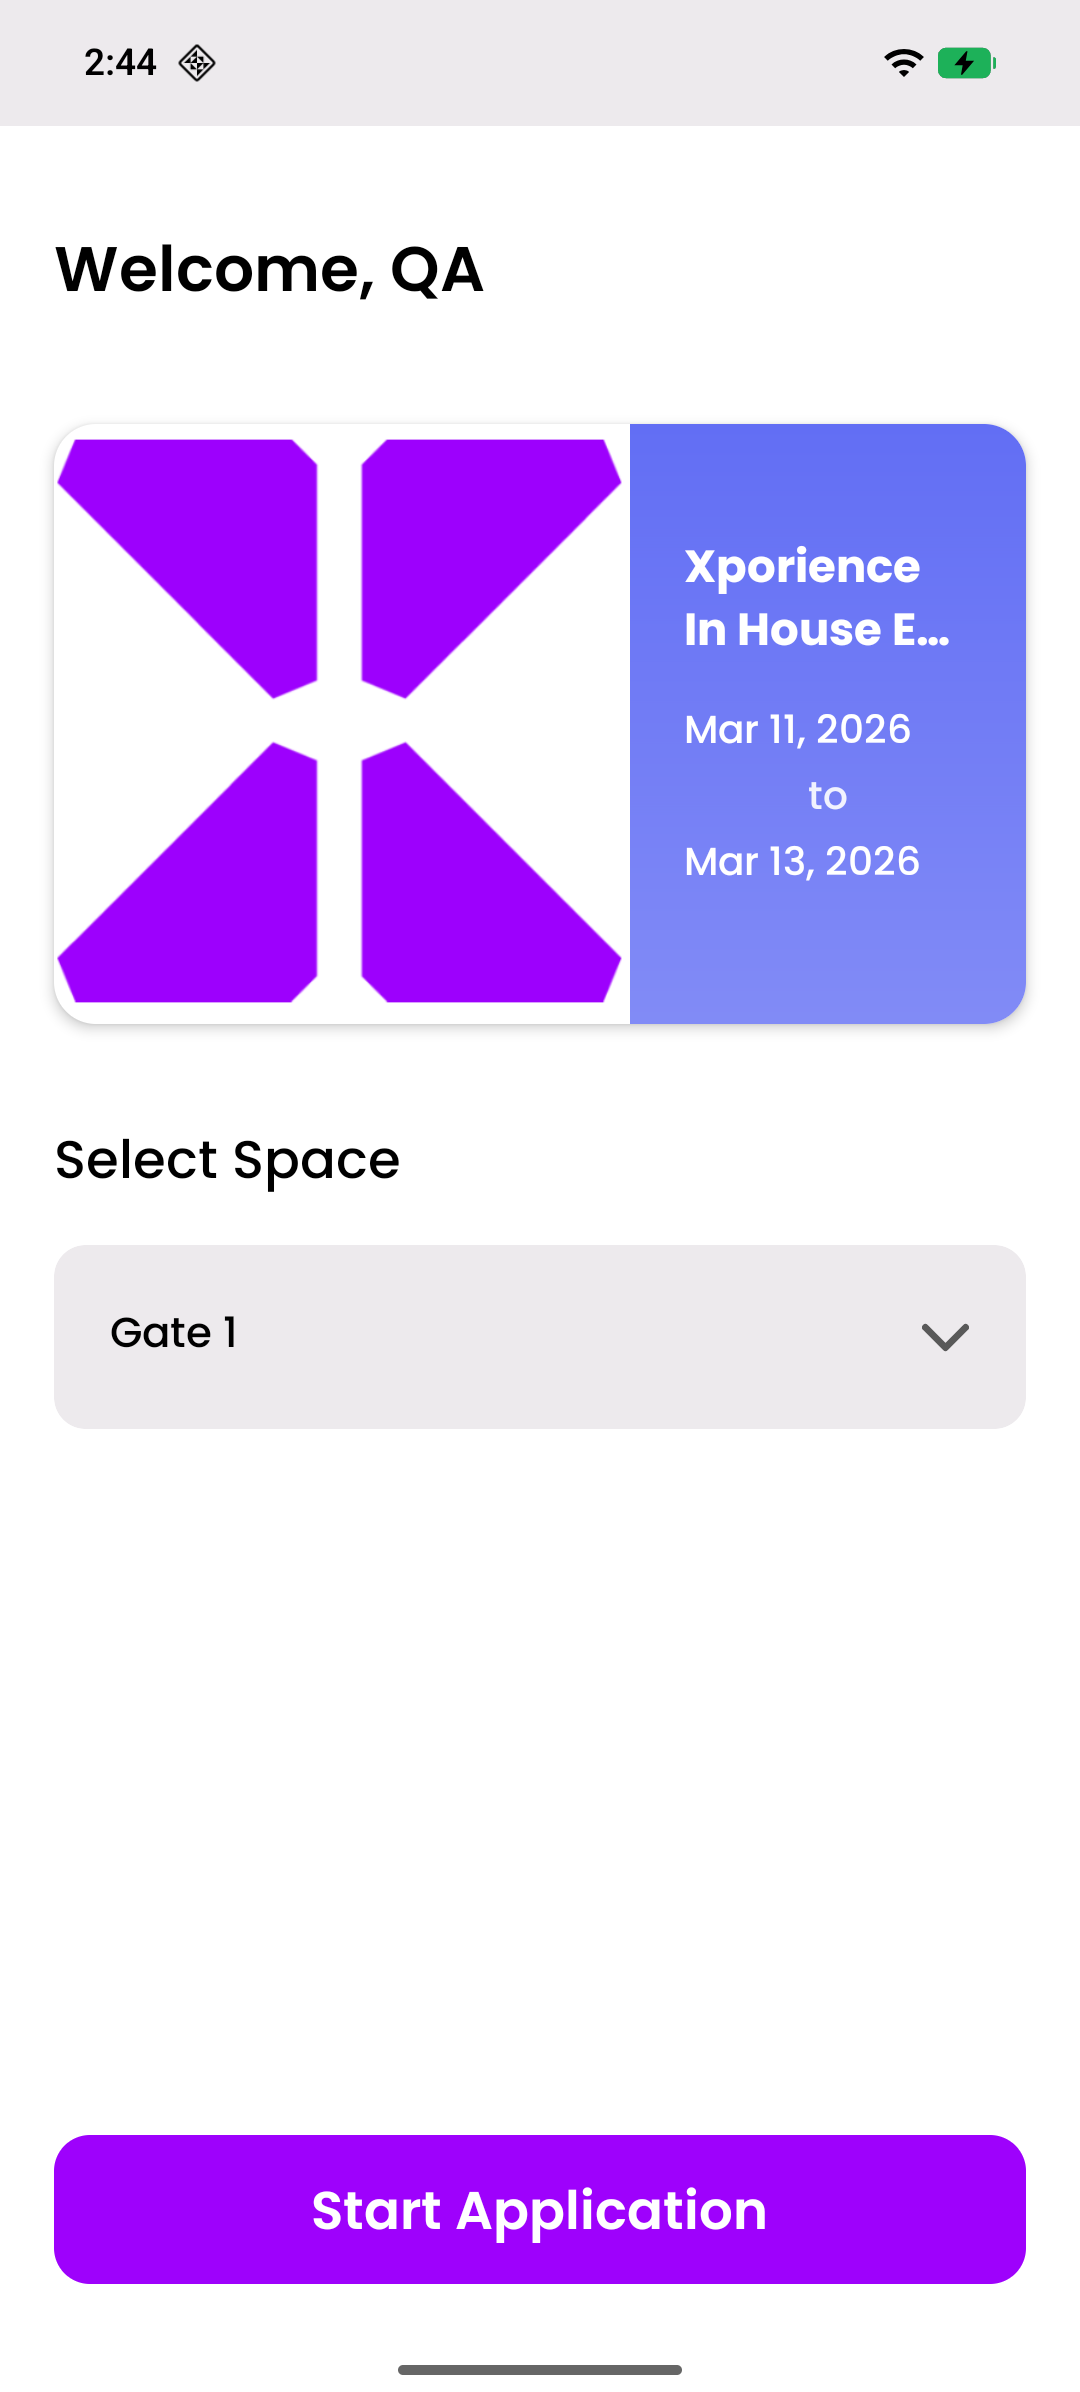
Home Screen

Main dashboard - Start your registration here

⏱️ 10 seconds
Home Screen - Main dashboard - Start your registration here
πŸ”Click to enlarge

πŸ“ Step-by-Step Instructions

1
Welcome message with your name is displayed at the top
2
Event card shows:
β€’ Event logo (left side)
β€’ Event name (e.g., "Xporience")
β€’ Event dates (start and end dates)
3
Selected space is displayed (e.g., "Gate 1")
4
Tap "Start Application" button to begin registration
⚠
⚠️ Make sure space is selected before starting (button will be disabled if not)
πŸ“Έ
06

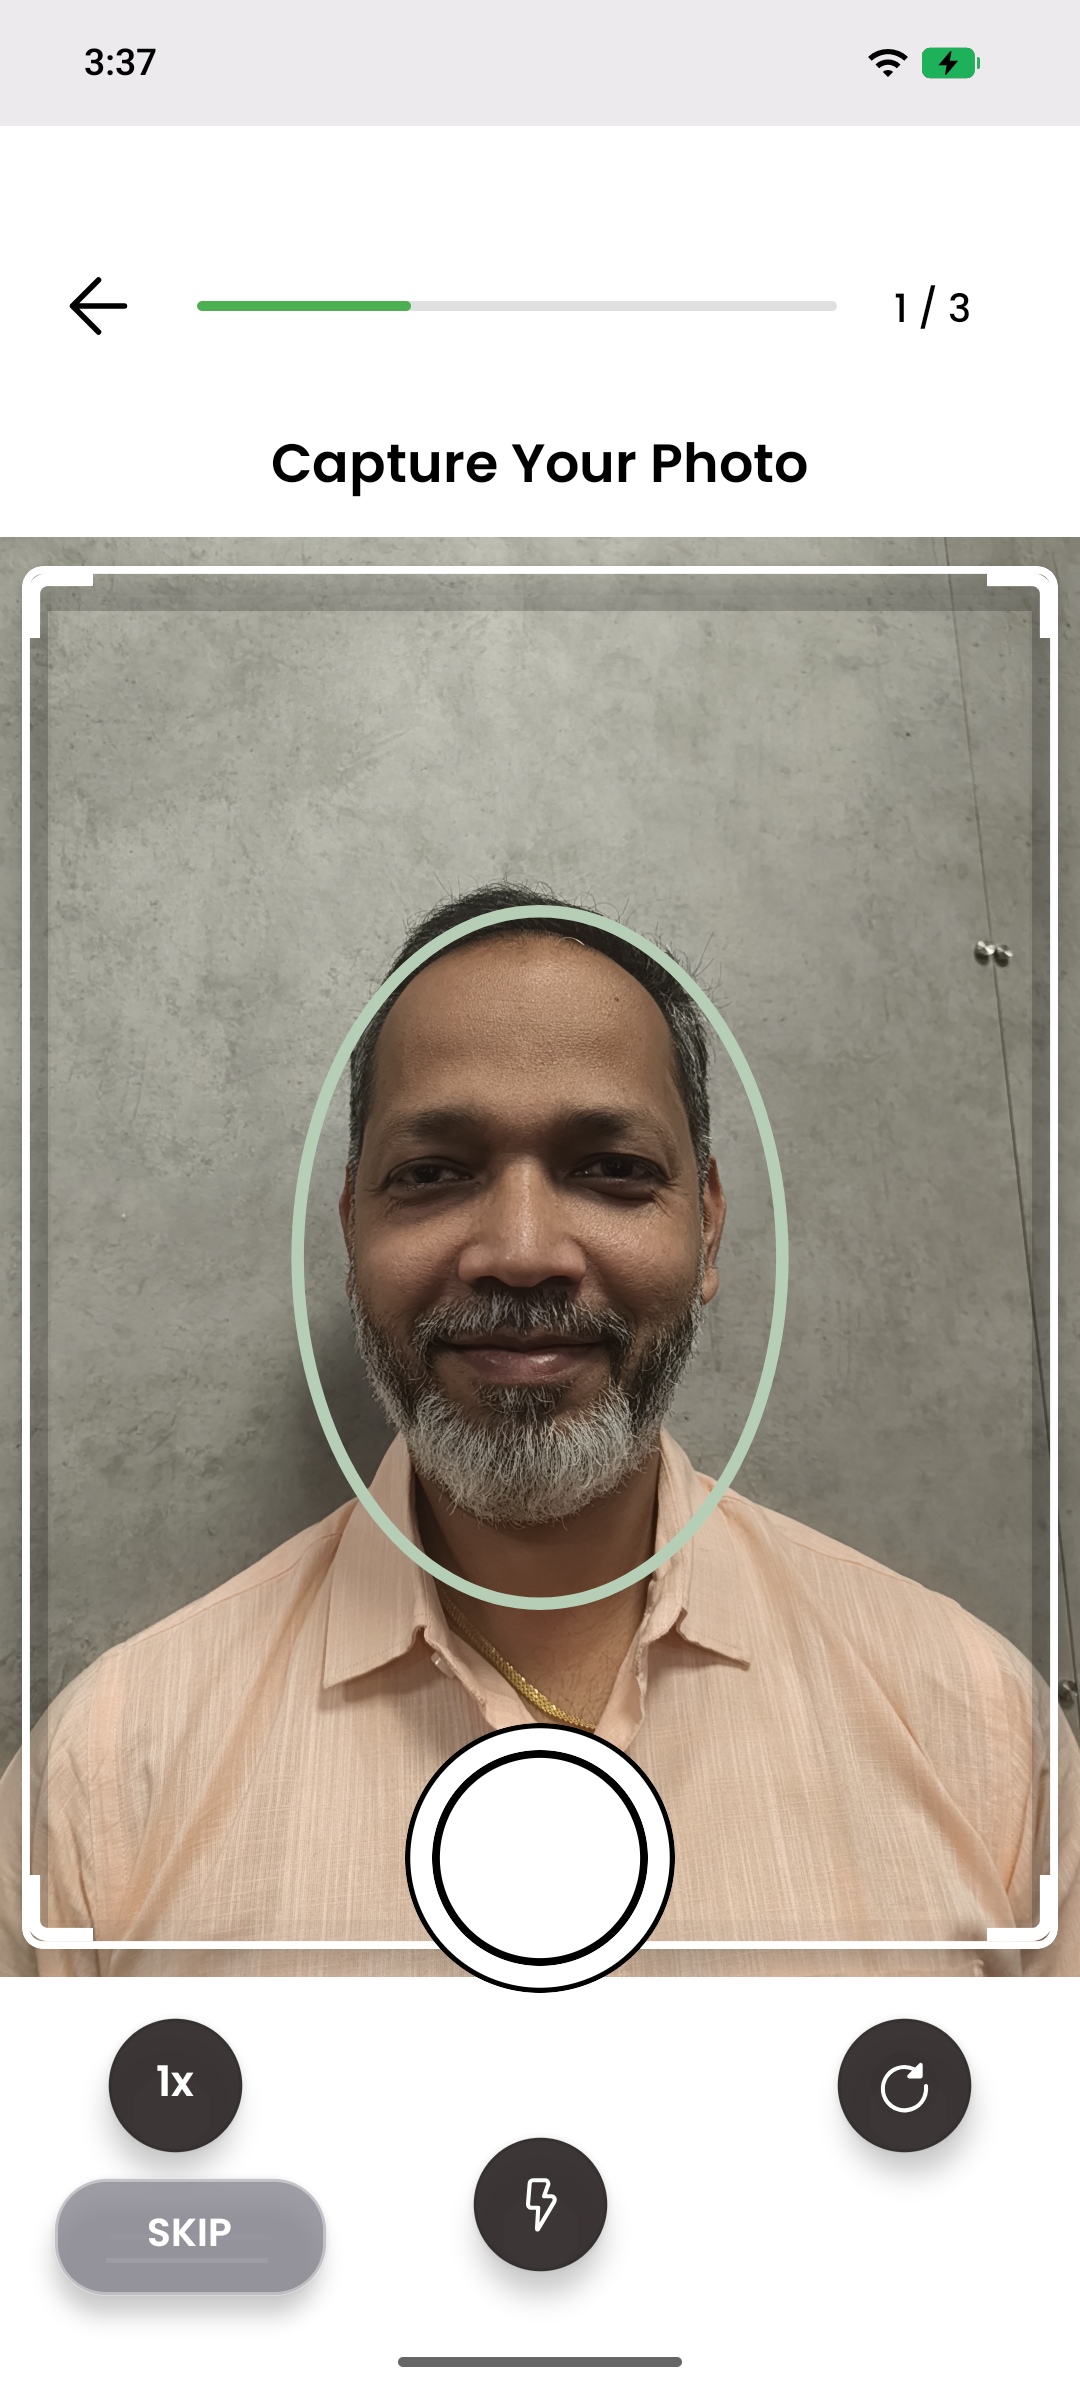
Step 1: Capture Your Photo

Take a clear photo of yourself for registration

⏱️ 1-2 minutes
Step 1: Capture Your Photo - Take a clear photo of yourself for registration
πŸ”Click to enlarge

πŸ“ Step-by-Step Instructions

1
Position yourself in front of the camera
2
Align your face within the green oval guide frame shown on screen
3
Make sure your face is clearly visible and well-lit
4
Tap the white circular capture button (center bottom) to take photo
5
Camera controls available:
β€’ Zoom: Tap "1x" button to cycle through 1x, 2x, 3x, 4x zoom levels
β€’ Flash: Tap lightning icon to toggle flash on/off
β€’ Flip Camera: Tap circular arrow icon to switch front/rear camera
6
You can skip this step, but it's highly recommended to complete it
οΏ½
πŸ’‘ Tip: Use good lighting and look directly at the camera
⚠
⚠️ For new onsite registration, Step 1 is mandatory
⚠️Important

For new registrations, Step 1 is required. Skip option is only available when editing existing registrations.

πŸ‘€
07

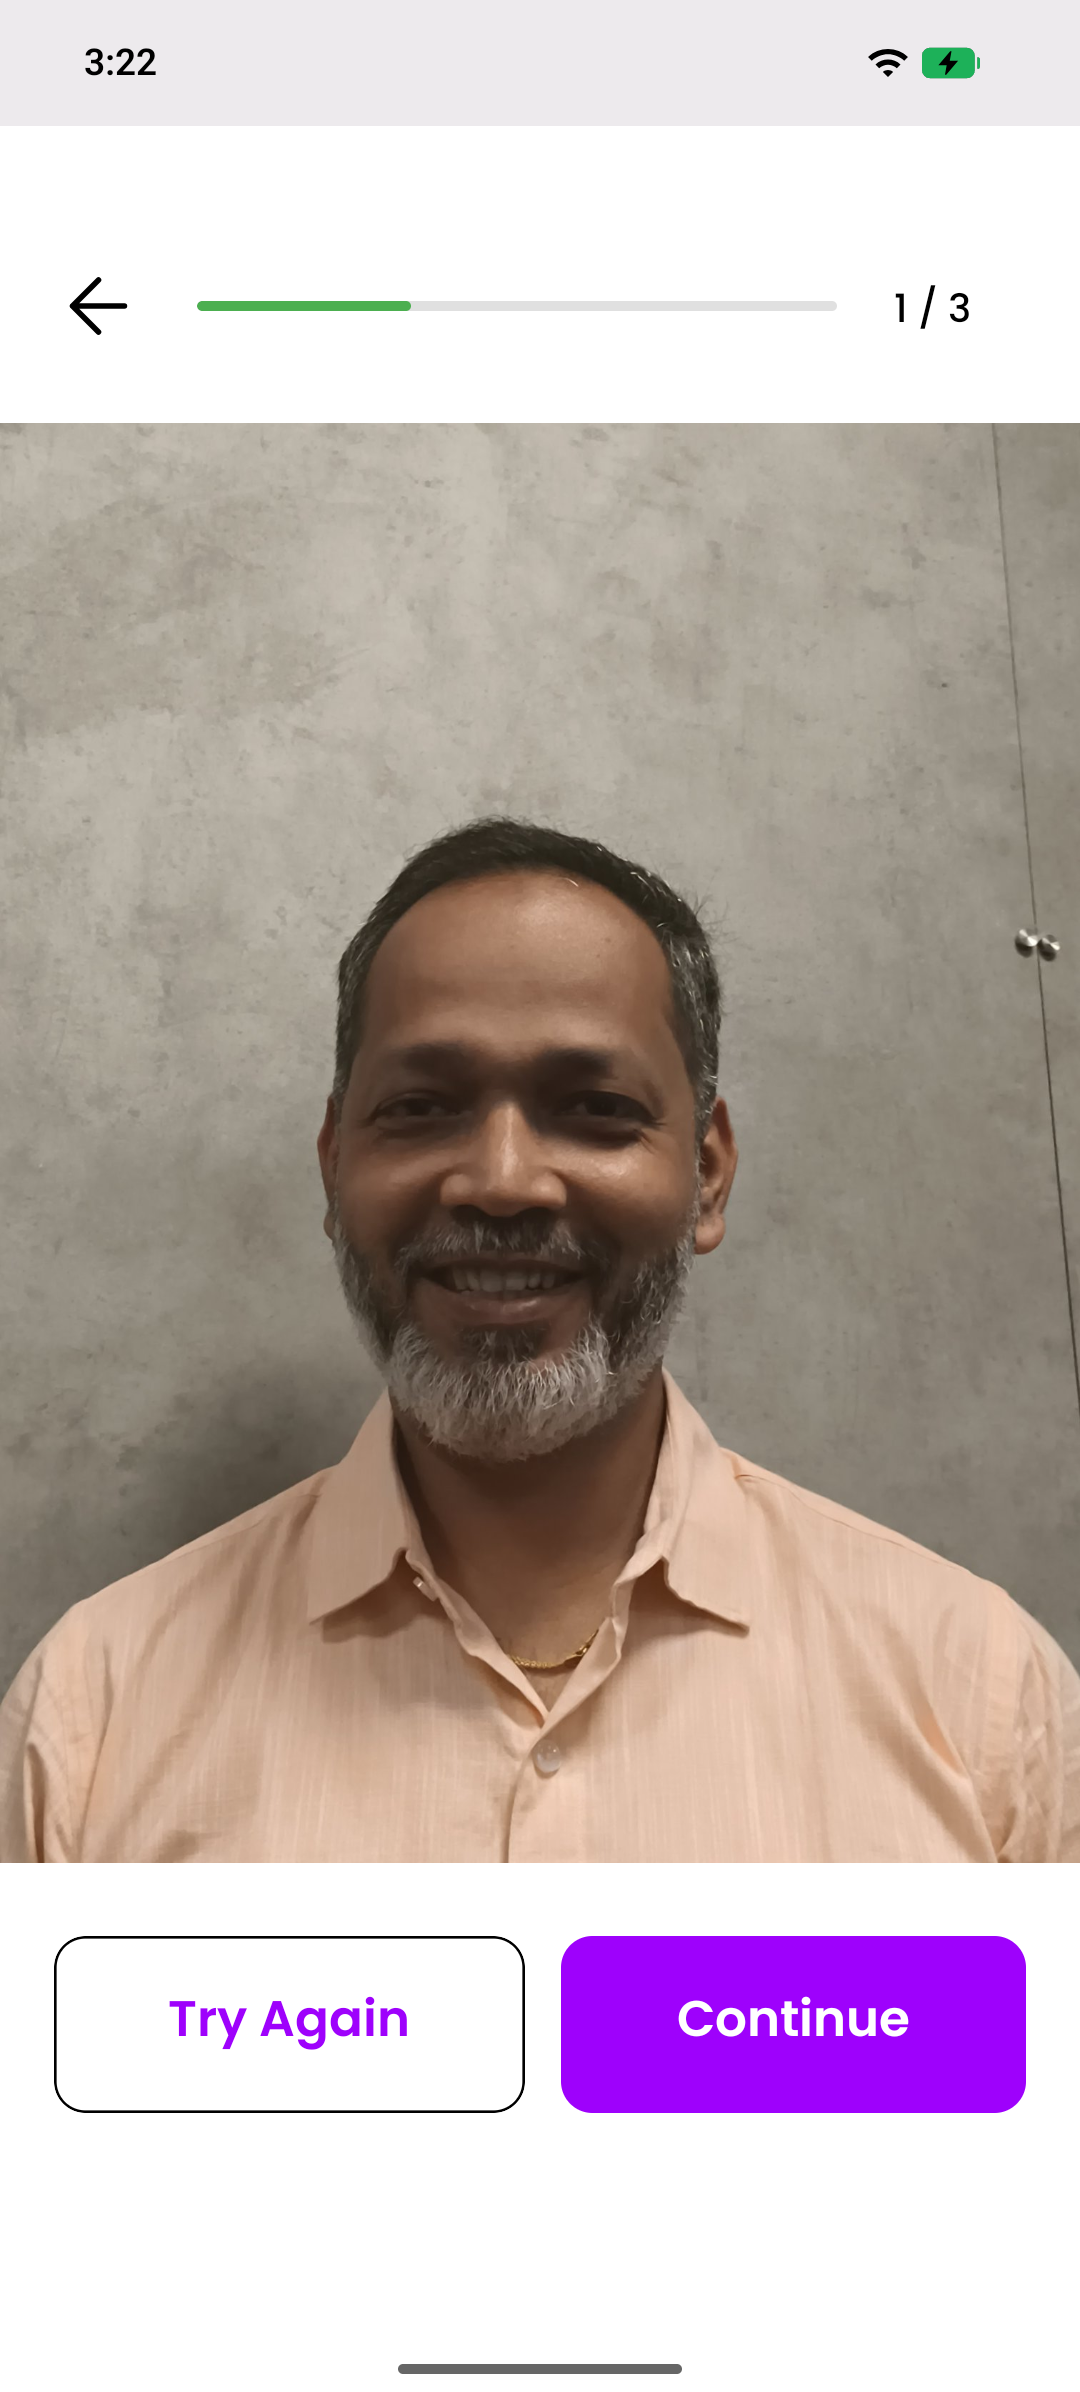
Review Captured Photo

Check your photo before proceeding

⏱️ 30 seconds
Review Captured Photo - Check your photo before proceeding
πŸ”Click to enlarge

πŸ“ Step-by-Step Instructions

1
Review your captured photo displayed on screen
2
Check that:
β€’ Your face is clearly visible
β€’ Photo is not blurry
β€’ Lighting is adequate
β€’ You are centered in the frame
3
If satisfied, tap "Continue" button (purple, right side)
4
If not satisfied, tap "Try Again" button (white with purple border, left side)
5
After tapping "Try Again", you can retake the photo
6
Once you tap "Continue", you'll proceed to Step 2
οΏ½
πŸ’‘ Tip: Take your time to ensure the photo quality is good
πŸ“„
08

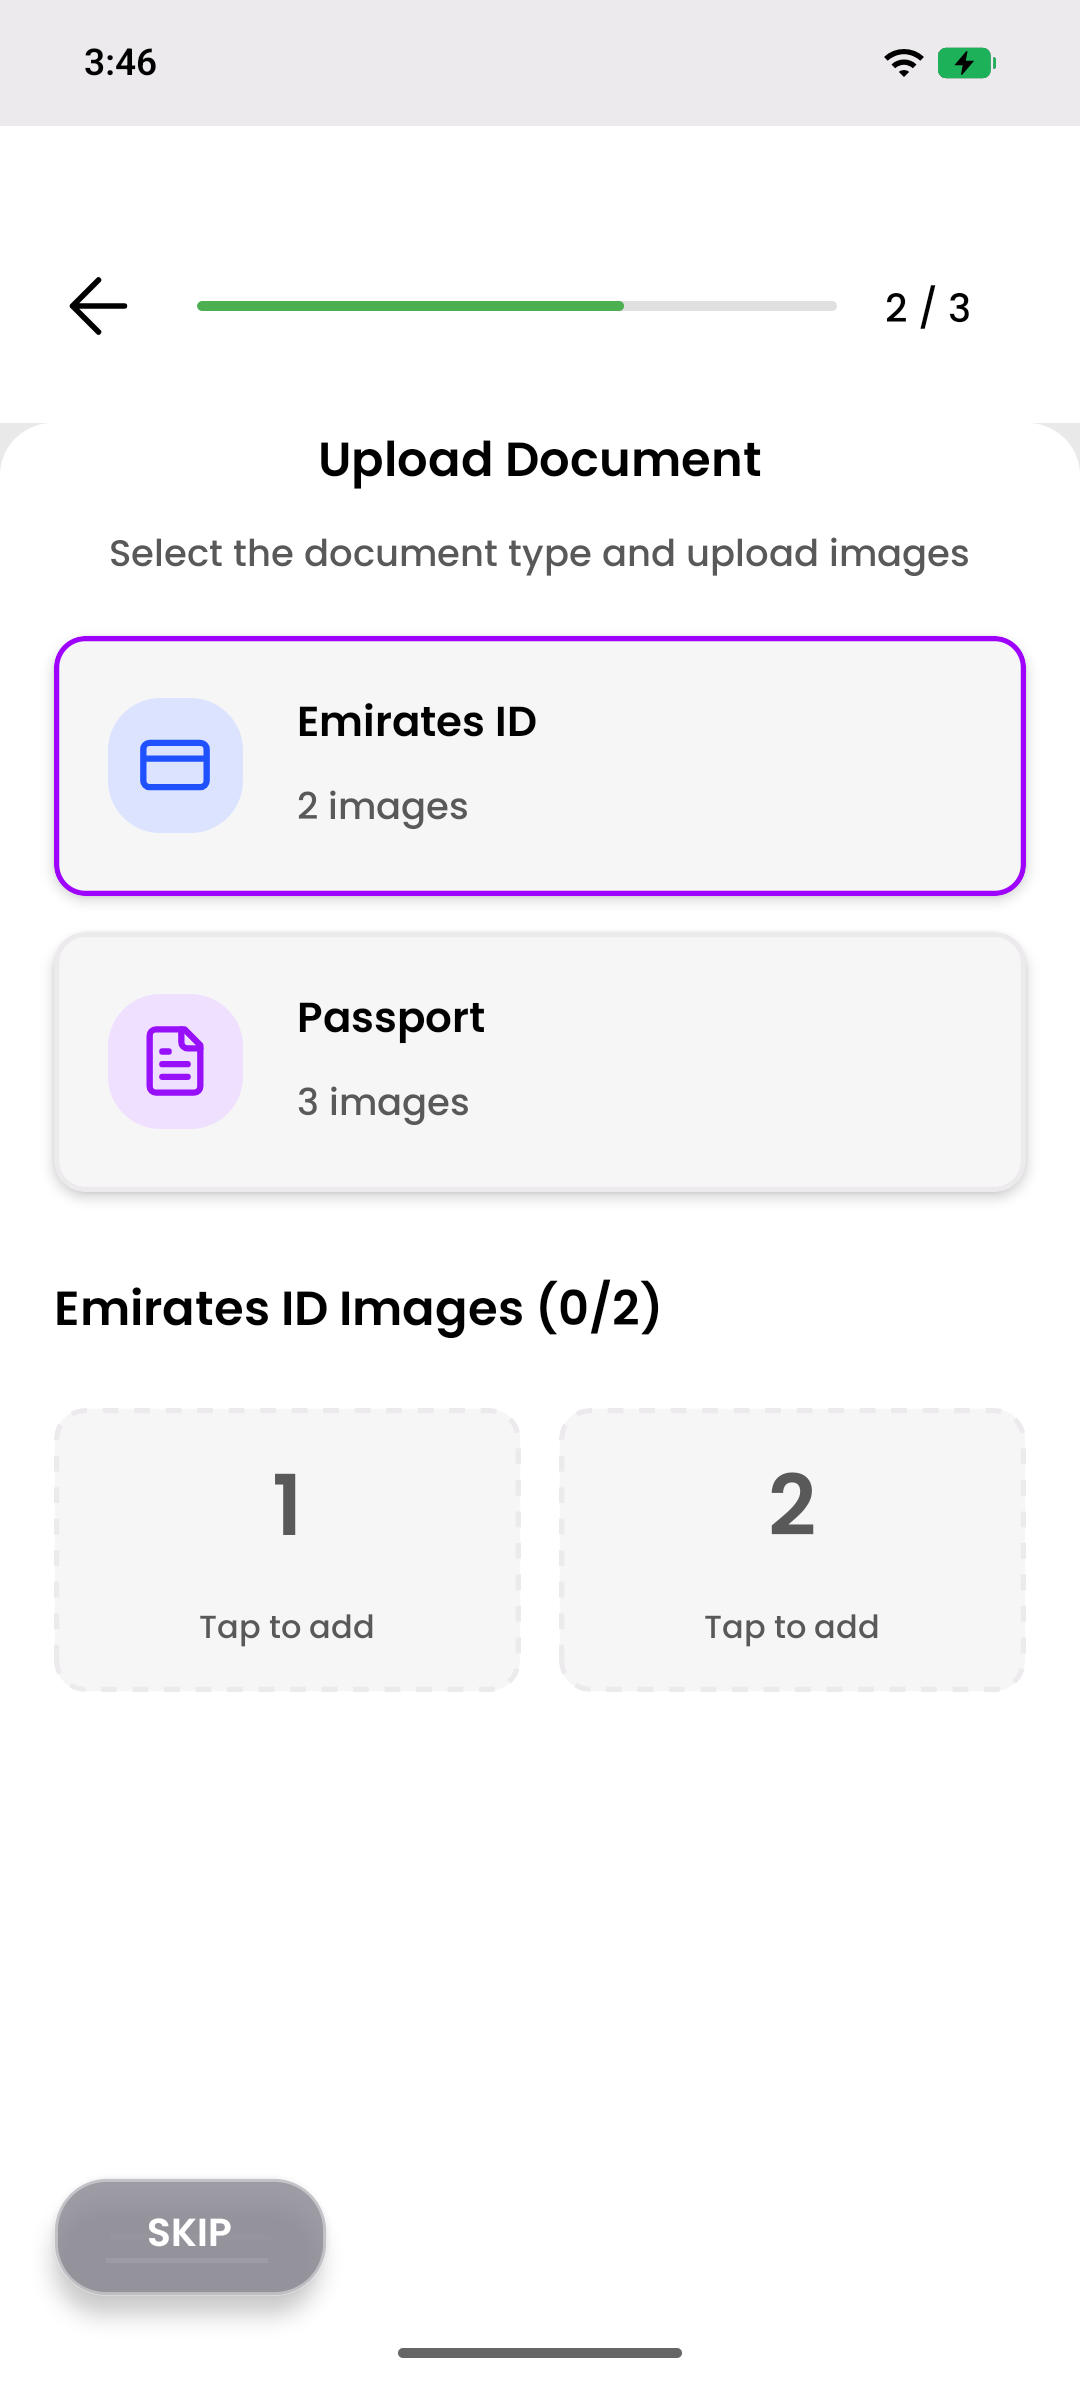
Step 2: Upload Documents

Select document type and upload required images

⏱️ 2-3 minutes
Step 2: Upload Documents - Select document type and upload required images
πŸ”Click to enlarge

πŸ“ Step-by-Step Instructions

1
Select your document type:
β€’ Emirates ID - requires 2 images (front and back)
β€’ Passport - requires 3 images (cover, page 1, page 2)
2
The selected document type will have a purple border
3
You'll see empty slots showing "Tap to add"
4
Tap on any empty slot to open the document scanner
5
You can skip this step, but at least one step (1 or 2) must be completed
⚠
⚠️ For new onsite registration, both Step 1 and Step 2 are mandatory
οΏ½
πŸ’‘ Skip option is only for editing existing registrations
οΏ½
πŸ“ After capturing, images will appear in the slots
⚠️Important

For new registrations, both Step 1 and Step 2 must be completed. Skip is only available when editing existing registrations.

πŸ“·
09

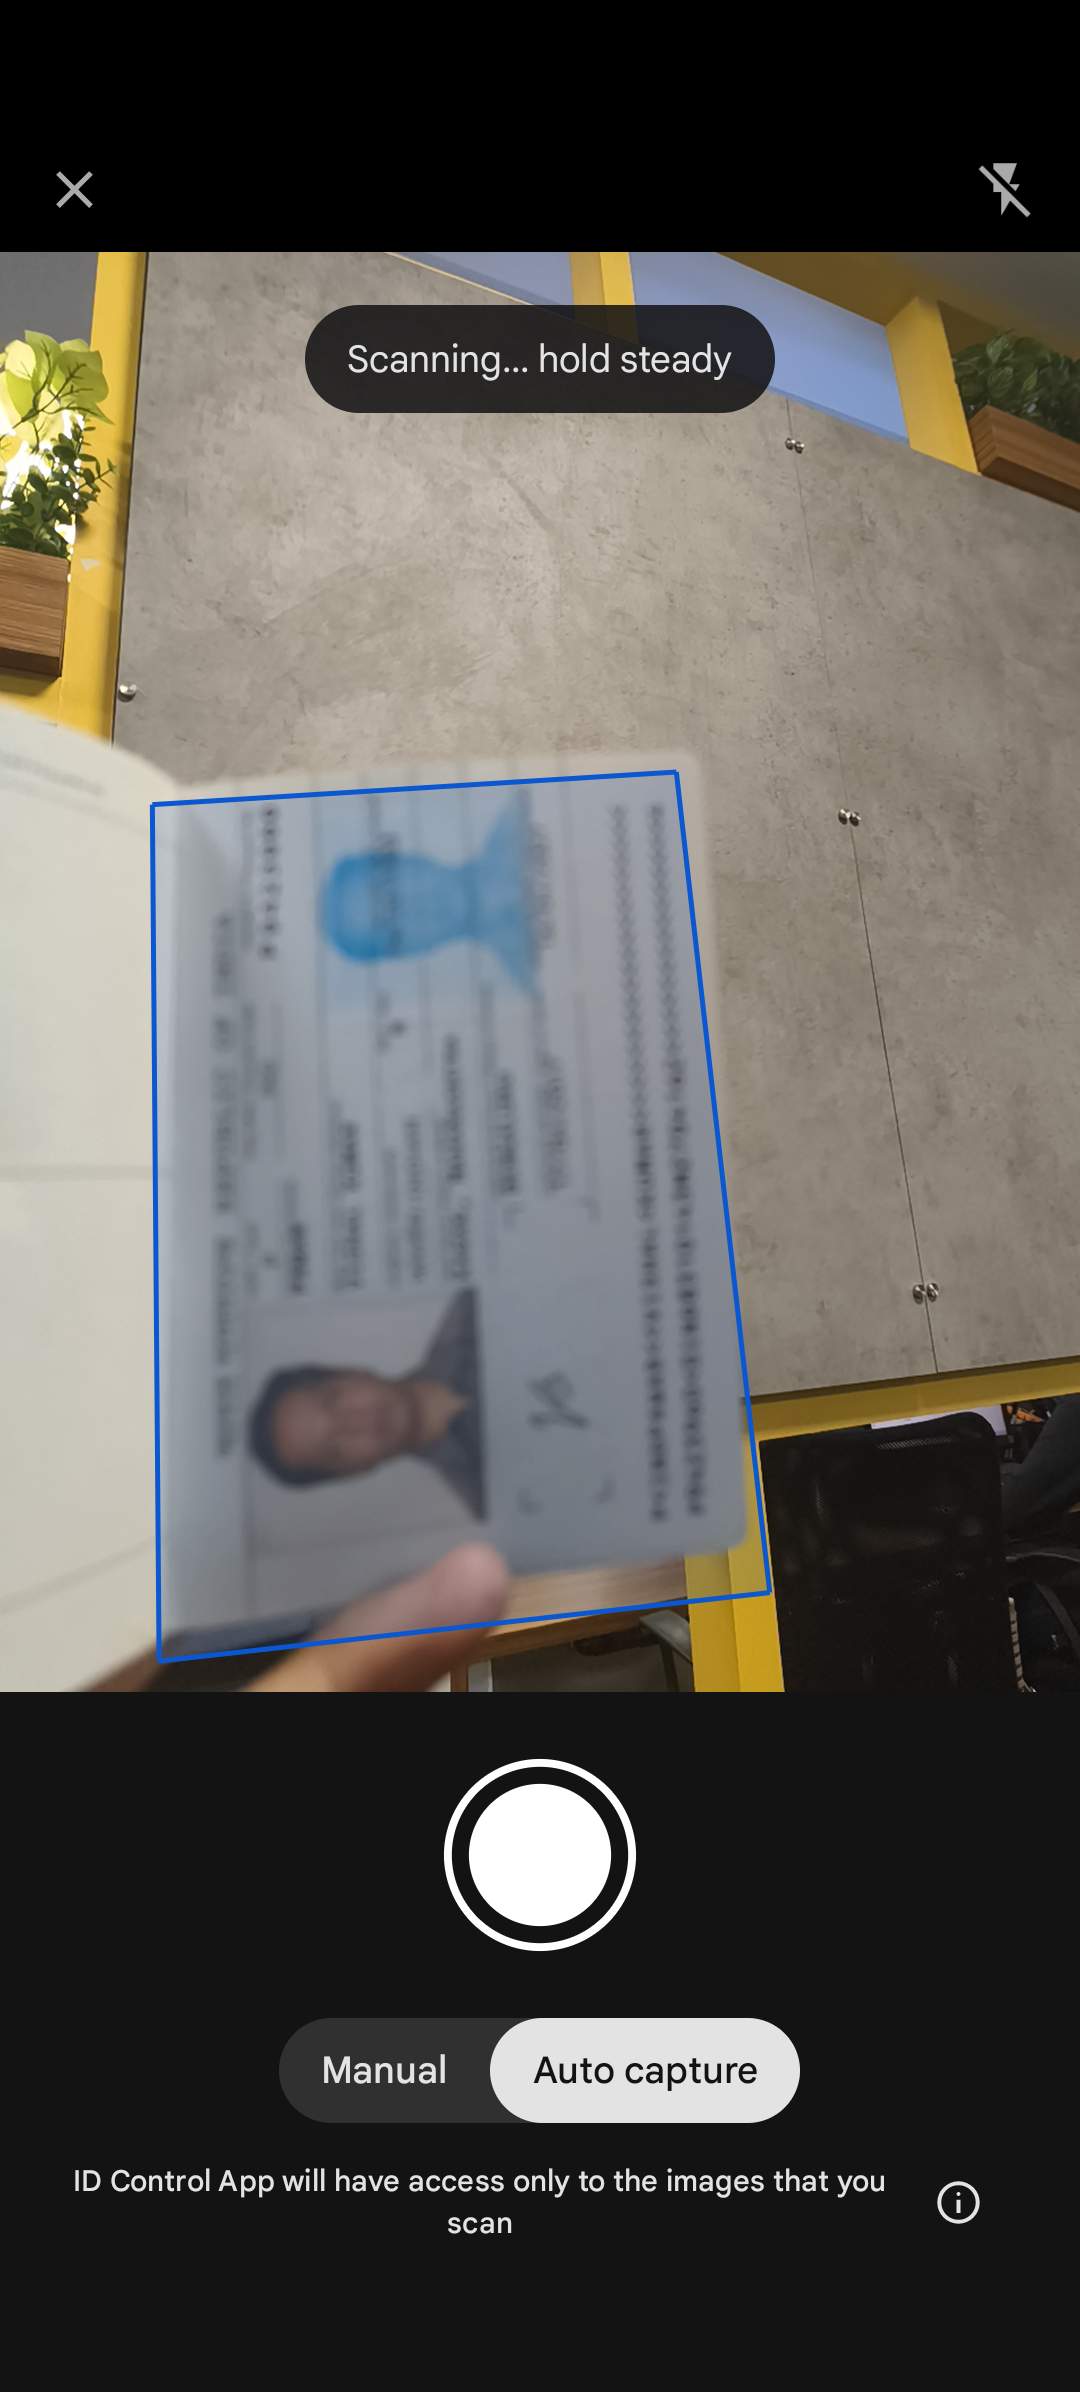
Document Scanning

Scan your document using the camera

⏱️ 30 seconds per image
Document Scanning - Scan your document using the camera
πŸ”Click to enlarge

πŸ“ Step-by-Step Instructions

1
Position your document within the blue detection frame
2
Hold the document steady - the app will automatically detect it
3
Choose your capture mode:
β€’ Auto Capture (selected by default) - automatically captures when document is detected
β€’ Manual - tap the white circular button to capture manually
4
Make sure:
β€’ All text is clear and readable
β€’ Document is flat and within the frame
β€’ Good lighting (avoid shadows)
β€’ No glare or reflections
5
The app will show "Scanning... hold steady" message
6
Tap "X" (top left) to cancel and go back
οΏ½
πŸ’‘ Tip: Keep the document flat and ensure it fills the blue frame
⚠
⚠️ For best OCR results, ensure text is clear and document is well-lit
βœ…
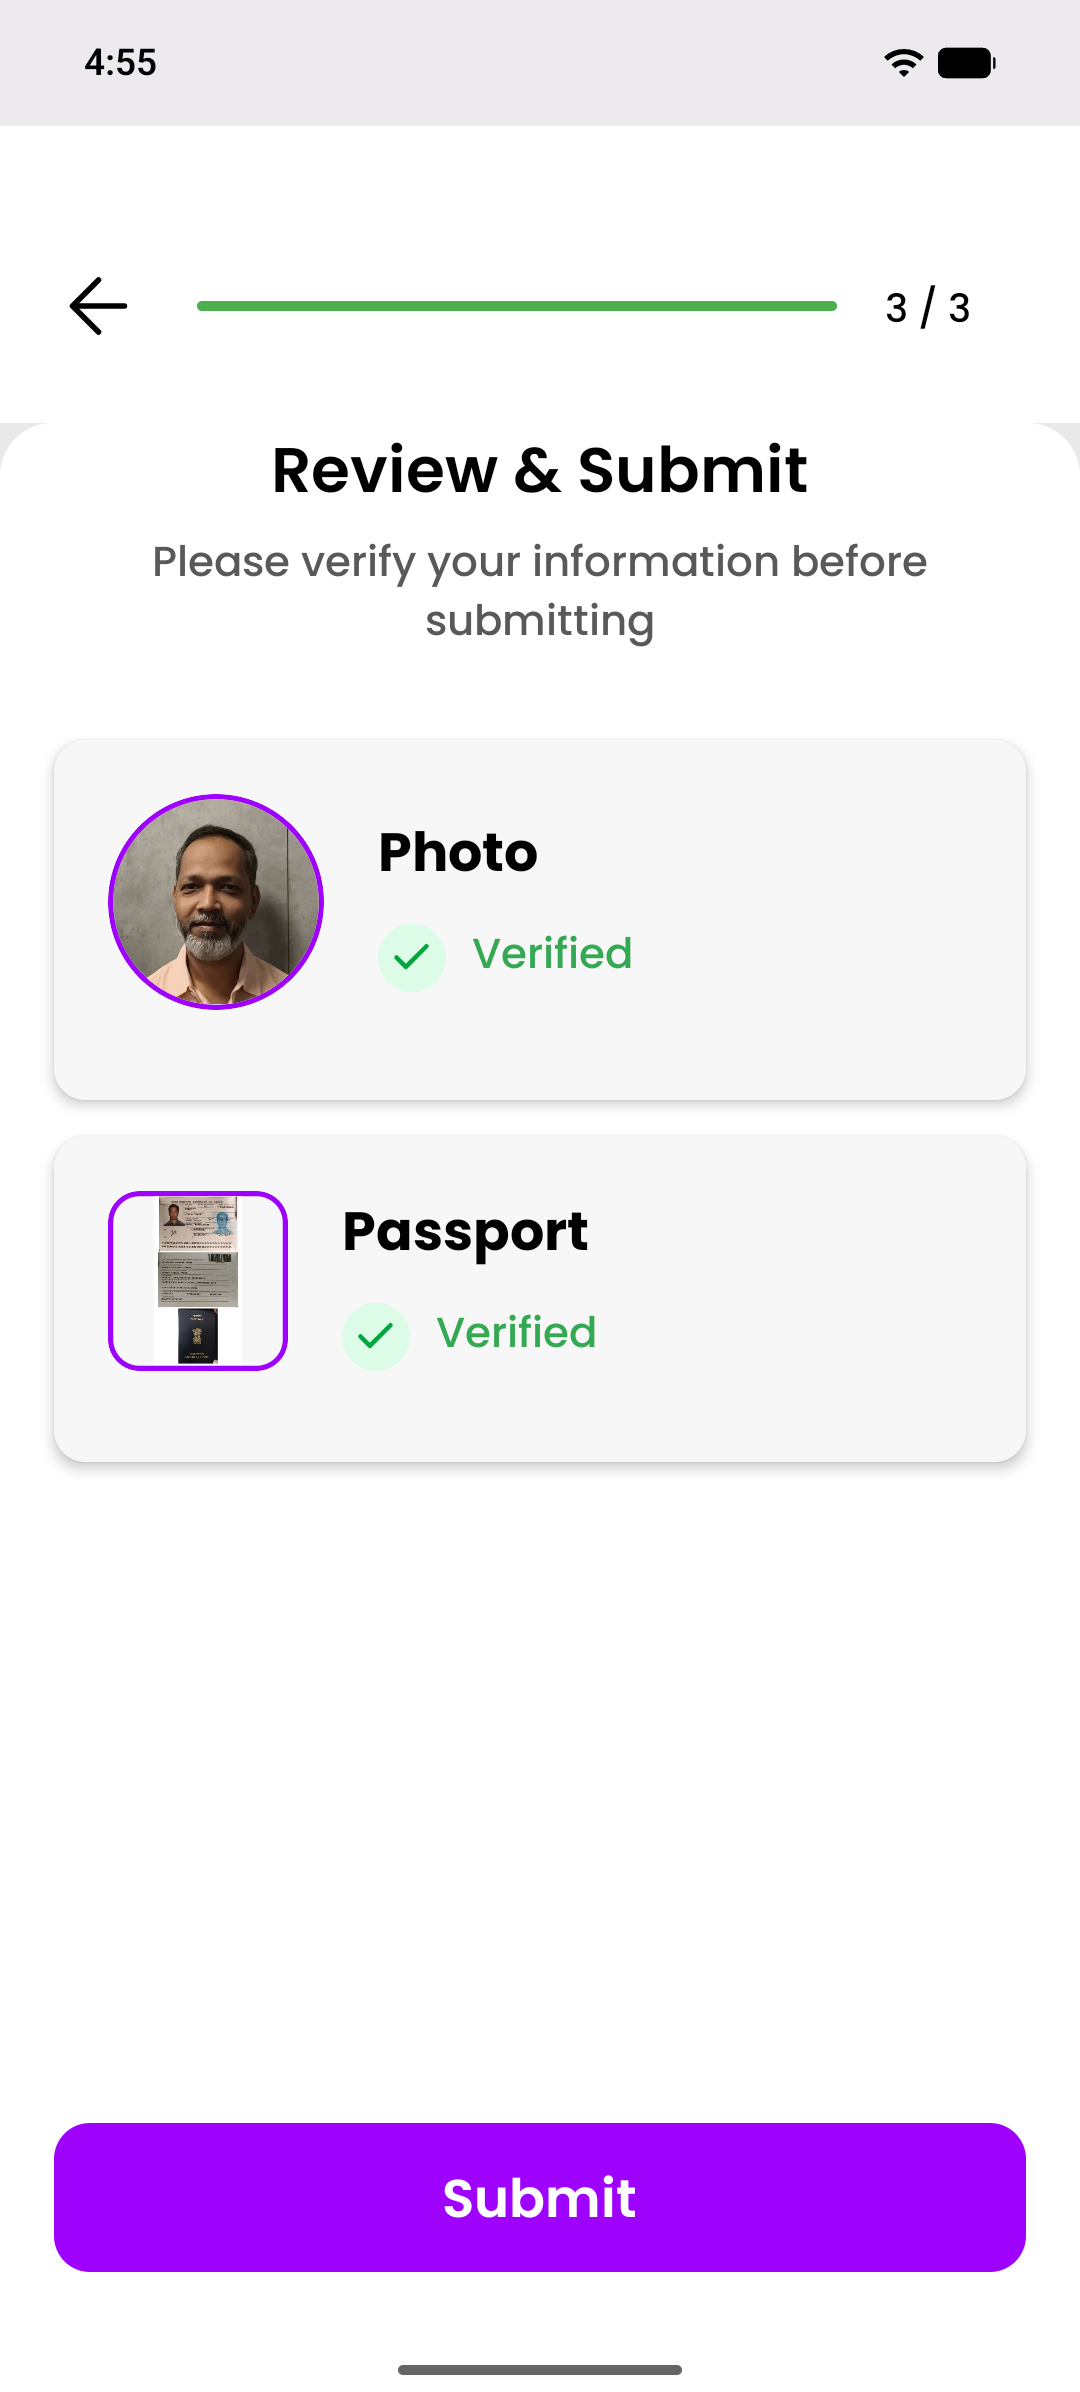
10

Step 3: Review & Submit

Final review before submitting your registration

⏱️ 1 minute
Step 3: Review & Submit - Final review before submitting your registration
πŸ”Click to enlarge

πŸ“ Step-by-Step Instructions

1
Review your captured photo:
β€’ Photo is displayed in a circular frame with purple border
β€’ Tap on the photo to view it in full screen
2
Review your uploaded documents:
β€’ Document preview is shown in a rectangular frame
β€’ Tap on the document to view it in full screen
3
Verify all information is correct
4
Check that both photo and document are verified (green checkmark)
5
Tap "Submit" button (purple, bottom of screen) to complete registration
6
Wait for upload to complete
οΏ½
πŸ’‘ Tip: Double-check all images before submitting - you won't be able to change them after
⚠
⚠️ Make sure you have internet connection for successful upload
πŸ“€
11

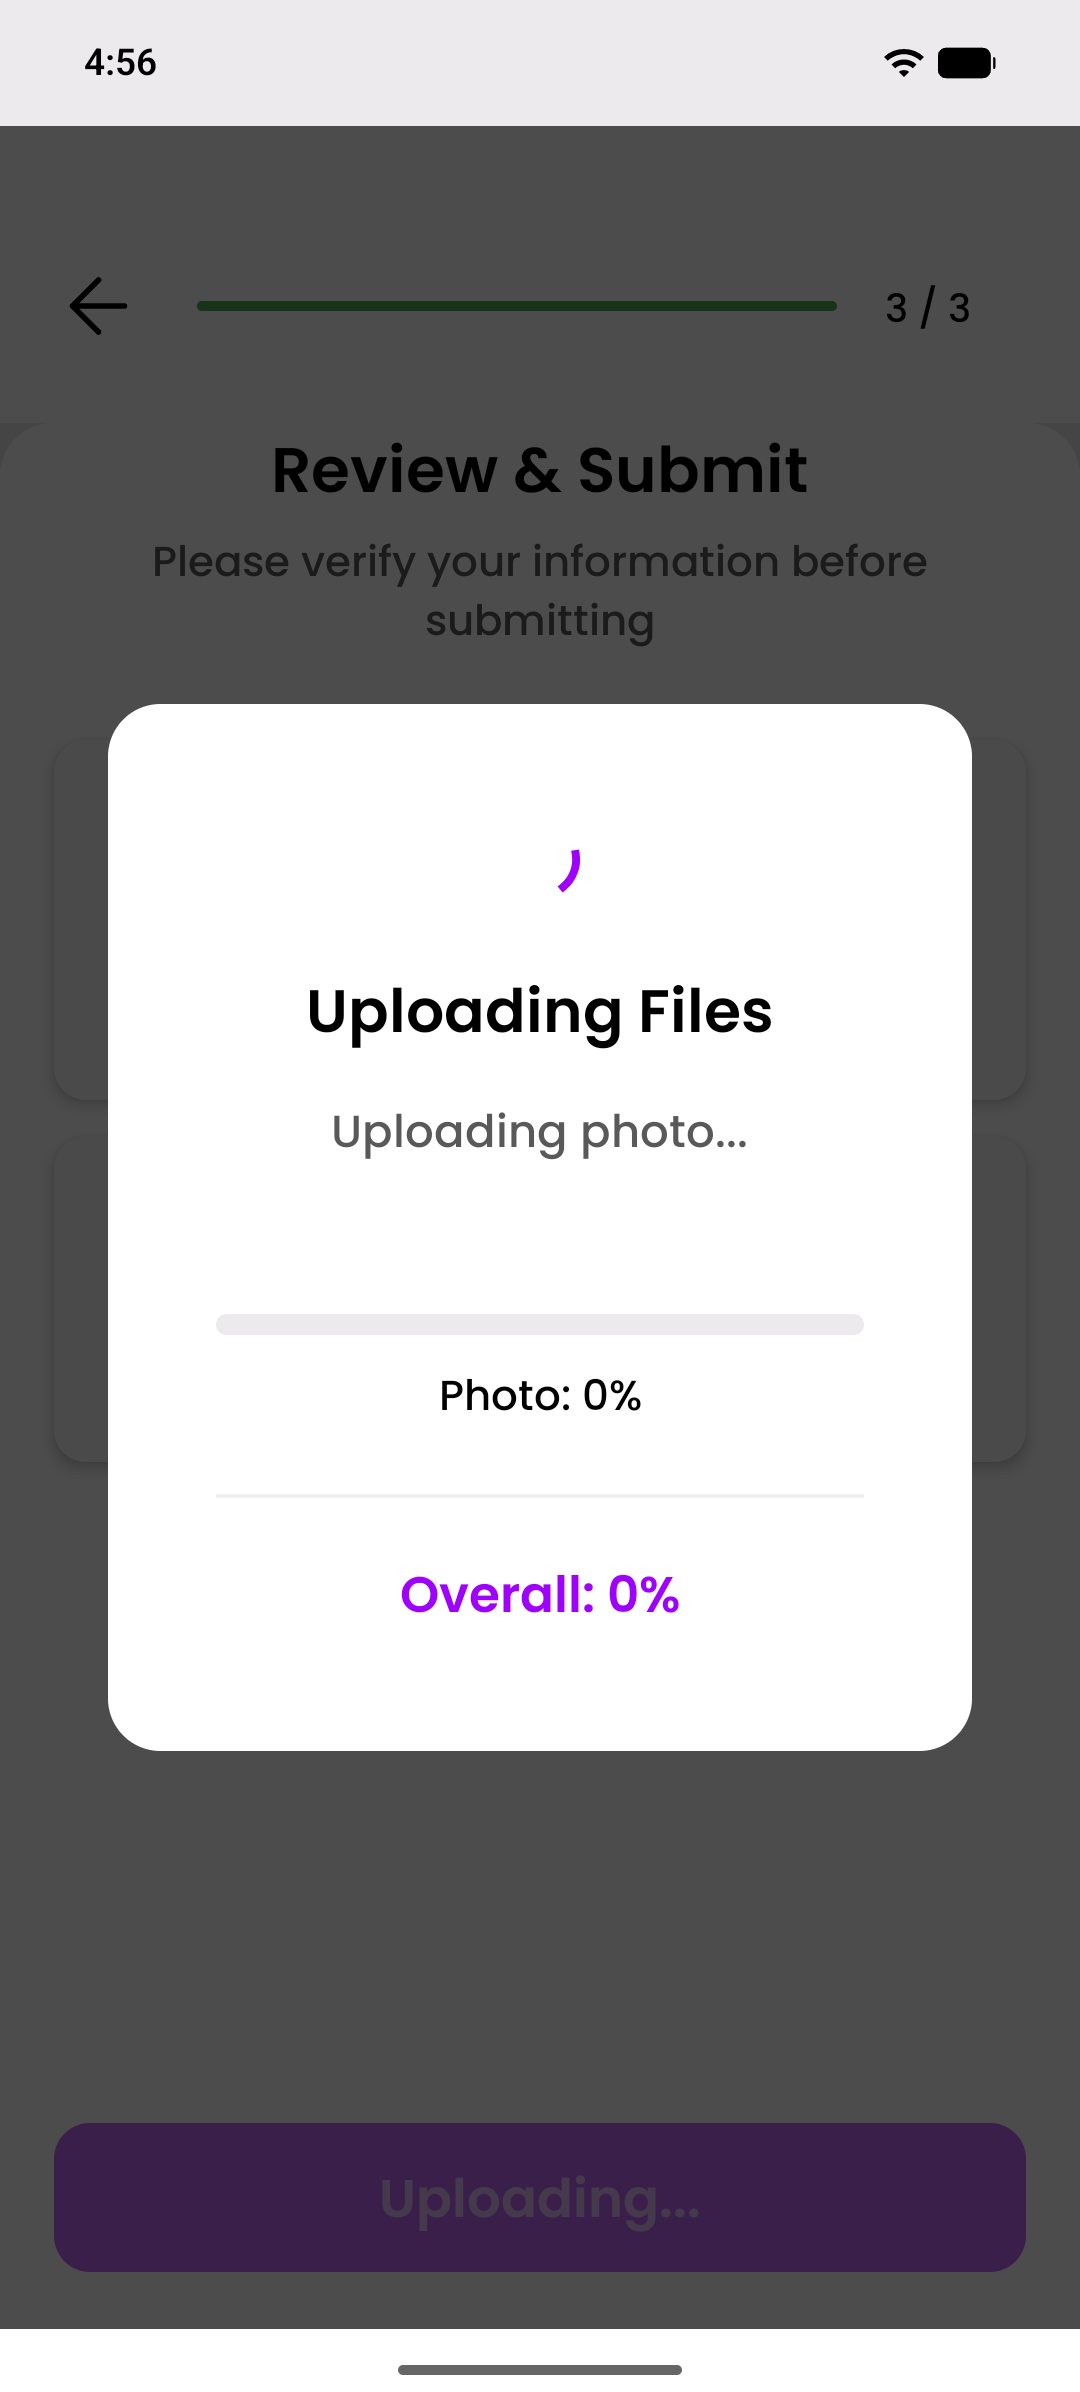
Upload Progress

Files are being uploaded to the server

⏱️ 30 seconds - 2 minutes
Upload Progress - Files are being uploaded to the server
πŸ”Click to enlarge

πŸ“ Step-by-Step Instructions

1
Upload progress dialog will appear automatically after tapping Submit
2
You can see real-time progress for:
β€’ Photo upload percentage (e.g., "Photo: 45%")
β€’ Document upload percentage
β€’ Overall upload progress (e.g., "Overall: 30%")
3
The dialog shows "Uploading Files" title
4
Current upload status is displayed (e.g., "Uploading photo...")
5
Wait for upload to complete - do not close the app
6
After completion, you'll be automatically redirected to QR Code screen
⏱
⏱️ Upload time depends on:
β€’ Your internet connection speed
β€’ File sizes
β€’ Server response time
οΏ½
πŸ’‘ Tip: Keep the app open and ensure stable internet connection
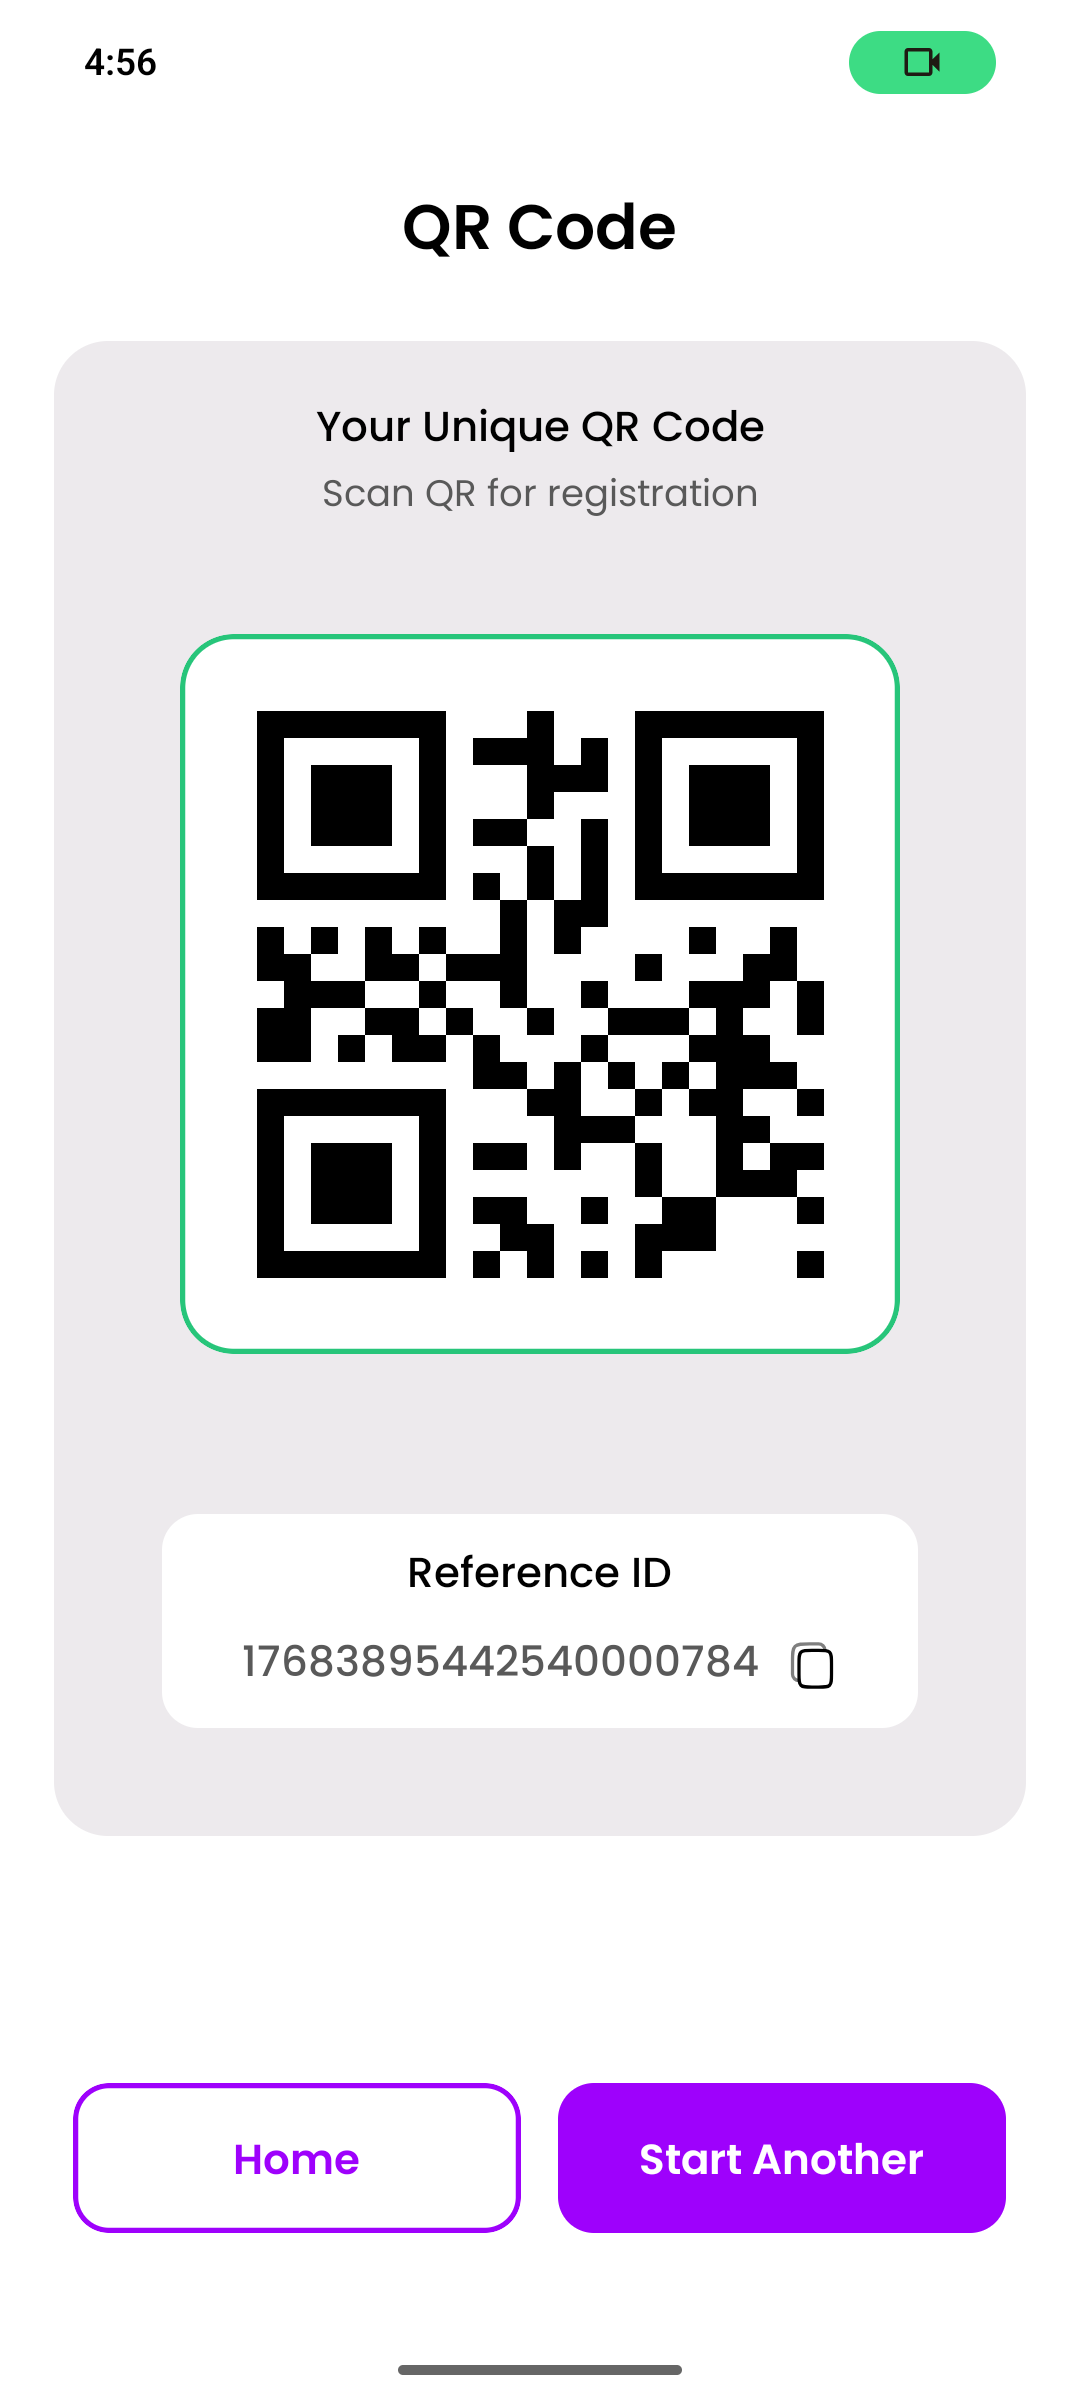
πŸ“±
12

QR Code Screen

Your unique registration QR code and reference ID

⏱️ 10 seconds
QR Code Screen - Your unique registration QR code and reference ID
πŸ”Click to enlarge

πŸ“ Step-by-Step Instructions

1
Your unique QR code is displayed in a large green-bordered frame
2
Reference ID is shown below the QR code (e.g., "17683895442540000784")
3
Tap the copy icon (two overlapping squares) to copy Reference ID to clipboard
4
This QR code contains all your registration information
5
Show this QR code at event check-in points for verification
6
Action buttons at the bottom:
β€’ "Home" (left) - Returns to Home screen
β€’ "Start Another" (right) - Begins a new registration
οΏ½
πŸ’‘ Tip: Take a screenshot of your QR code for easy access
οΏ½
πŸ“± The QR code can be scanned by event staff using their devices
πŸ†

Final Badge Preview

See how your completed badge will look

After completing registration and scanning your QR code at the event venue, your final badge will be generated. The badge includes:

βœ“
Your photo
βœ“
Document information
βœ“
QR code for verification
βœ“
Event details and dates
βœ“
Reference ID
βœ“
Visitor information

πŸ“„ Sample Badge PDF

View exactly how your final badge will look

🎯 Quick Reference

Registration TypeStep 1 (Photo)Step 2 (Documents)Step 3
New Registrationβœ… Requiredβœ… RequiredReview & Submit
Editing Existing⏭️ Can Skip⏭️ Can SkipReview & Submit

Note: When editing, at least one step (1 or 2) must be completed.